Mintlify (https://mintlify.com/ ↗) 作为下一代文档平台,以其简洁易用的 MDX 组件体系和现代化的界面设计,成为了技术文档写作的首选工具。它提供了丰富的组件库,如 <Card>、<Accordion>、<Tab> 等,让技术文档不再枯燥乏味。
然而,在实际使用 Mintlify 进行技术写作时,我发现了一个显著的痛点:组件属性设置效率低下。每当需要配置一个组件的属性时,都必须手动输入属性名和值,还要查阅文档确认属性类型和可选值。对于复杂组件如 <Card> 或 <ParamField>,这个过程既耗时又容易出错。
这正是 FlashMintlify 插件要解决的核心问题:让技术写作者专注于内容架构和价值传达,而不是被属性设置的细节所困扰。
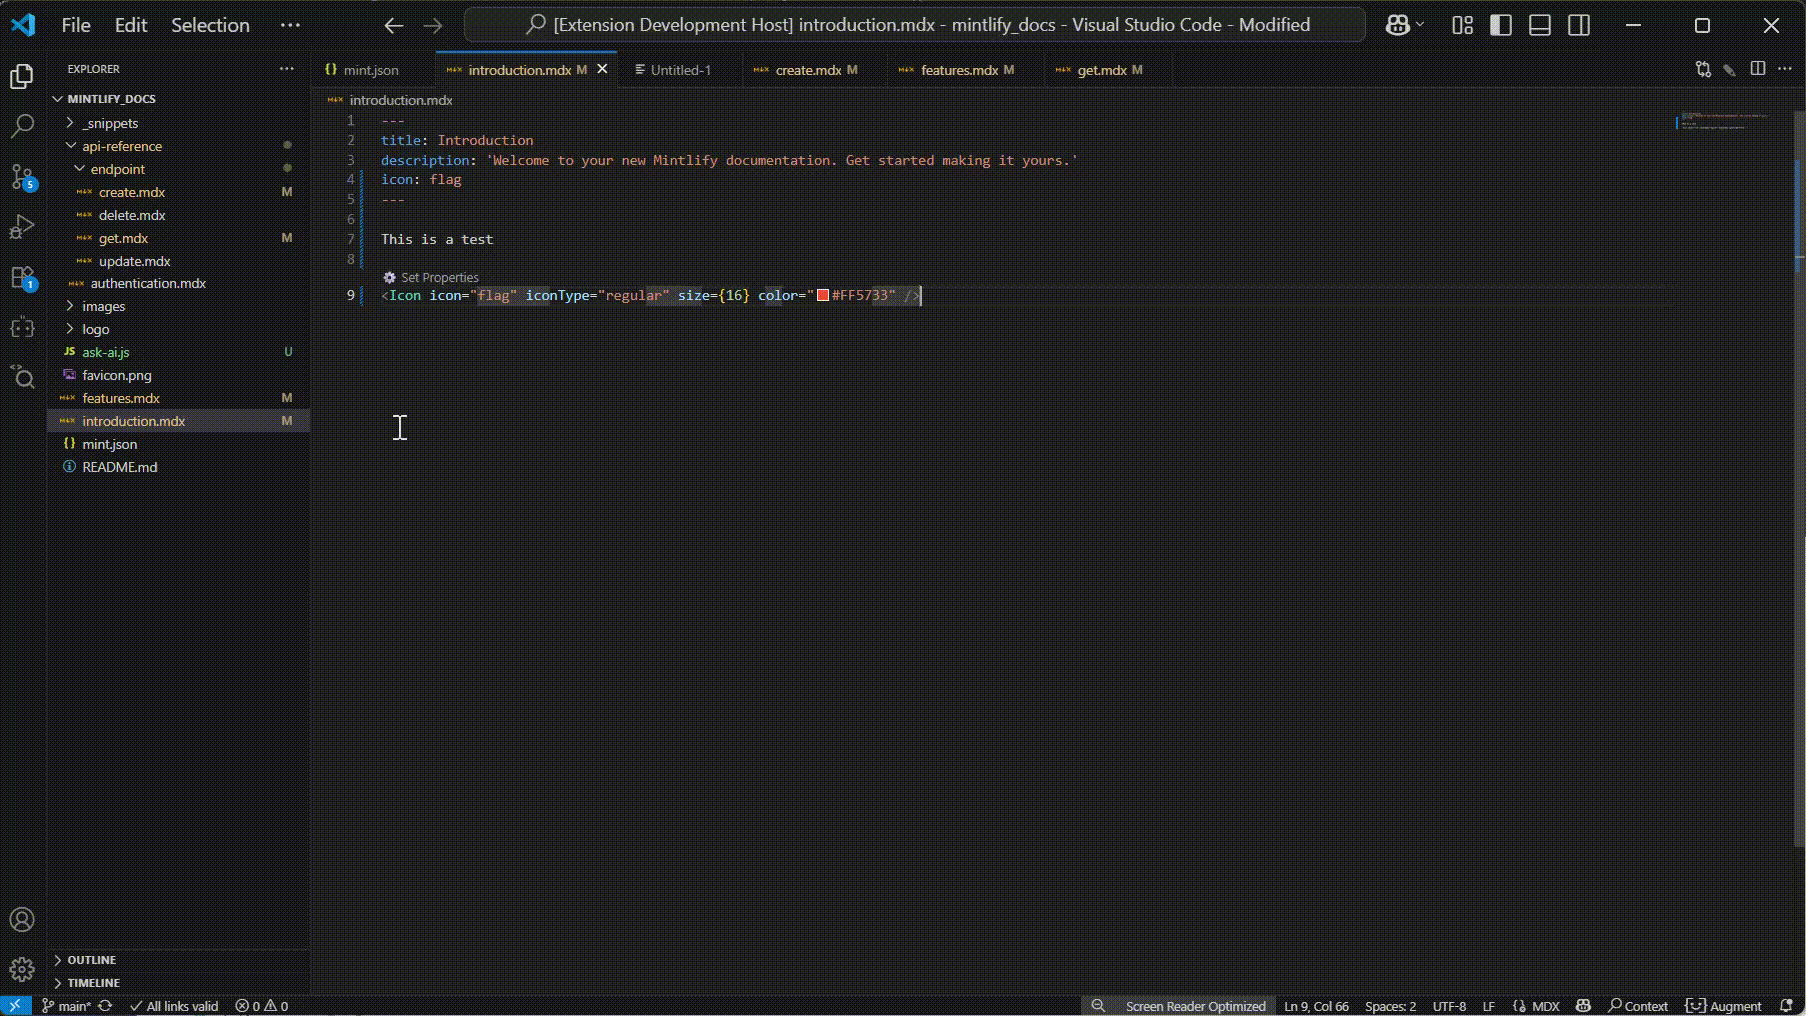
今天我要分享的功能点是:CodeLens 与可视化属性设置的串联实现。这个功能通过在 Mintlify 组件上显示设置按钮,点击后弹出可视化设置面板,让属性配置变得直观高效。
演示和下载#
- 功能演示:
- VSCode 插件市场下载:FlashMintlify ↗
- GitHub 仓库链接:https://github.com/Match-Yang/FlashMintlify ↗
功能点详解#
用户痛点分析#
在使用 Mintlify 进行技术写作时,开发者面临以下挑战:
- 属性名记忆负担:每个组件都有多个属性,需要查阅文档才能确认正确的属性名
- 属性值类型不明确:boolean、string、number 等类型容易混淆,导致语法错误
- 可选值查找困难:如
iconType属性的可选值需要在文档中查找 - 属性修改效率低:修改现有属性需要手动定位和编辑
- 缺乏实时反馈:无法直观预览属性修改的效果
设计思路#
为解决这些痛点,我设计了一套 CodeLens + WebView 的可视化属性设置方案:
- 智能识别:自动识别文档中的 Mintlify 组件
- 一键触发:在组件上显示 CodeLens 设置按钮
- 可视化表单:基于组件配置动态生成属性设置界面
- 类型安全:根据属性类型提供相应的输入控件
- 批量更新:一次性更新所有修改的属性
技术实现架构#
整体数据流架构#
graph TB
A[用户在编辑器中编写 Mintlify 组件] --> B[MintlifyComponentCodeLensProvider 扫描文档]
B --> C{检测到 Mintlify 组件?}
C -->|是| D[解析现有属性]
C -->|否| E[结束]
D --> F[创建 CodeLens with '⚙️ Set Properties' 按钮]
F --> G[用户点击 CodeLens 按钮]
G --> H[触发 'flashMintlify.component.setAttributes' 命令]
H --> I[PropertySetterPanel.createOrShow 被调用]
I --> J[加载 mintlify-components.json 配置]
J --> K[创建 WebView 面板]
K --> L[基于配置生成可视化表单]
L --> M[用户在表单中修改属性]
M --> N[用户点击 Save 按钮]
N --> O[收集所有表单数据]
O --> P[发送 saveAttributes 消息到扩展]
P --> Q[批量更新组件属性到编辑器]
Q --> R[显示成功提示]
时序交互流程#
sequenceDiagram
participant User as 用户
participant Editor as VS Code 编辑器
participant CodeLens as CodeLens Provider
participant Command as Command Handler
participant WebView as Property Panel
participant Config as 配置文件
User->>Editor: 编写 Card 组件
Editor->>CodeLens: 触发 provideCodeLenses()
CodeLens->>Config: 加载 mintlify-components.json
Config-->>CodeLens: 返回组件配置
CodeLens->>CodeLens: 正则匹配组件标签
CodeLens->>CodeLens: 解析现有属性
CodeLens-->>Editor: 返回 CodeLens 对象
Editor->>User: 显示 Set Properties 按钮
User->>CodeLens: 点击 CodeLens 按钮
CodeLens->>Command: 触发 setAttributes 命令
Command->>WebView: 创建 PropertySetterPanel
WebView->>Config: 读取组件属性配置
Config-->>WebView: 返回属性定义
WebView->>WebView: 生成可视化表单HTML
WebView-->>User: 显示属性设置界面
User->>WebView: 修改属性值
User->>WebView: 点击 Save 按钮
WebView->>WebView: 收集表单数据
WebView->>Command: 发送 saveAttributes 消息
Command->>Editor: 批量更新组件属性
Editor-->>User: 显示更新成功提示
配置驱动的组件识别机制#
graph TB
A["mintlify-components.json"] --> B["配置加载器"]
B --> C["组件配置缓存"]
D["文档内容"] --> E["正则表达式匹配
匹配组件标签"] E --> F["提取组件名称"] F --> G{"在配置中存在?"} G -->|是| H["创建CodeLens"] G -->|否| I["跳过"] C --> G H --> J["解析现有属性"] J --> K["生成属性设置命令"] style A fill:#e1f5fe style C fill:#f3e5f5 style H fill:#e8f5e8
匹配组件标签"] E --> F["提取组件名称"] F --> G{"在配置中存在?"} G -->|是| H["创建CodeLens"] G -->|否| I["跳过"] C --> G H --> J["解析现有属性"] J --> K["生成属性设置命令"] style A fill:#e1f5fe style C fill:#f3e5f5 style H fill:#e8f5e8
代码实现#
CodeLens Provider 核心实现#
class MintlifyComponentCodeLensProvider implements vscode.CodeLensProvider {
  private config: MintlifyConfig | null = null;

  constructor() {
    this.loadConfig();
  }

  provideCodeLenses(document: vscode.TextDocument): vscode.CodeLens[] {
    if (!this.config) return [];

    const codeLenses: vscode.CodeLens[] = [];
    const text = document.getText();

    // 匹配 Mintlify 组件标签 (支持自闭合和开放标签)
    const componentRegex = /<(\w+)([^>]*?)(?:\s*\/?>|>)/g;
    let match;

    while ((match = componentRegex.exec(text)) !== null) {
      const componentName = match[1];
      const attributesText = match[2];

      // 检查是否是 Mintlify 组件
      if (this.config.components[componentName]) {
        const range = new vscode.Range(
          document.positionAt(match.index),
          document.positionAt(match.index + match[0].length)
        );

        // 解析现有属性
        const existingAttributes = this.parseAttributes(attributesText);

        // 创建设置属性的 CodeLens
        const setAttributeCommand: vscode.Command = {
          title: '⚙️ Set Properties',
          tooltip: `Set properties for ${componentName} component`,
          command: 'flashMintlify.component.setAttributes',
          arguments: [componentName, range, existingAttributes]
        };

        codeLenses.push(new vscode.CodeLens(range, setAttributeCommand));
      }
    }

    return codeLenses;
  }

  private parseAttributes(attributesText: string): { [key: string]: string } {
    const attributes: { [key: string]: string } = {};

    // 匹配属性:name="value" 或 name={value} 或 name (布尔属性)
    const attrRegex = /(\w+)(?:=(?:"([^"]*)"|{([^}]*)}|([^\s>]+)))?/g;
    let match;

    while ((match = attrRegex.exec(attributesText)) !== null) {
      const attrName = match[1];
      const attrValue = match[2] || match[3] || match[4] || 'true';
      attributes[attrName] = attrValue;
    }

    return attributes;
  }
}实现要点说明:
- 正则表达式设计:
/<(\w+)([^>]*?)(?:\s*\/?>|>)/g能够匹配自闭合和开放标签两种形式 - 配置驱动:只有在
mintlify-components.json中定义的组件才会显示 CodeLens - 属性解析:支持三种属性格式:引号字符串、花括号表达式、布尔属性
- 位置精确:通过
positionAt方法确保 CodeLens 显示在正确的位置
WebView 面板动态生成#
export class PropertySetterPanel {
public static createOrShow(
extensionUri: vscode.Uri,
componentName: string,
range: vscode.Range,
existingAttributes: { [key: string]: string }
) {
// 创建固定在右侧的面板
const panel = vscode.window.createWebviewPanel(
'mintlifyPropertySetter',
`${componentName} Properties`,
{ viewColumn: vscode.ViewColumn.Two, preserveFocus: true },
{
enableScripts: true,
retainContextWhenHidden: true,
localResourceRoots: [
vscode.Uri.joinPath(extensionUri, 'media'),
vscode.Uri.joinPath(extensionUri, 'out', 'webview')
]
}
);
new PropertySetterPanel(panel, extensionUri, componentName, range, existingAttributes);
}
private getWebviewContent(
componentName: string,
componentConfig: ComponentConfig,
existingAttributes: { [key: string]: string },
range: vscode.Range
): string {
return `<!DOCTYPE html>
<html>
<body>
<div class="header">
<h2>Set Properties for <${componentName}></h2>
</div>
<div id="properties">
${Object.entries(componentConfig.attributes).map(([attrName, attrConfig]) =>
this.generatePropertyHtml(attrName, attrConfig, existingAttributes[attrName])
).join('')}
</div>
<div class="buttons">
<button class="button button-primary" onclick="saveAttributes()">Save</button>
<button class="button button-secondary" onclick="closePanel()">Close</button>
</div>
</body>
</html>`;
}
}关键设计要点:
- 固定布局:面板固定在右侧 (
ViewColumn.Two),不抢夺编辑器焦点 - 状态保持:
retainContextWhenHidden: true确保切换标签页时状态不丢失 - 动态表单生成:基于配置文件动态生成对应的输入控件
- 批量操作:统一收集所有修改后一次性更新
配置文件驱动的 UI 生成#
private generatePropertyHtml(attrName: string, attrConfig: ComponentAttribute, currentValue?: string): string {
  let inputHtml = '';

  switch (attrConfig.type) {
    case 'searchable':
      if (attrName === 'icon') {
        inputHtml = `
          <div class="icon-search">
            <input type="text" class="property-input" id="${attrName}"
                   placeholder="Search FontAwesome icons..." value="${currentValue || ''}"
                   oninput="searchIcons(this.value)">
            <div class="icon-results" id="${attrName}-results" style="display: none;"></div>
          </div>`;
      }
      break;
    case 'select':
      const options = attrConfig.options || [];
      inputHtml = `
        <select class="property-select" id="${attrName}">
          <option value="">Select...</option>
          ${options.map(option =>
            `<option value="${option}" ${currentValue === option ? 'selected' : ''}>${option}</option>`
          ).join('')}
        </select>`;
      break;
    case 'color':
      inputHtml = `
        <div class="color-input">
          <input type="color" class="color-picker" id="${attrName}-picker"
                 value="${(currentValue && /^#[0-9A-Fa-f]{6}$/.test(currentValue) ? currentValue : '#000000')}">
          <input type="text" class="property-input" id="${attrName}"
                 value="${currentValue || ''}" placeholder="#FF5733" pattern="^#[0-9A-Fa-f]{6}$">
        </div>`;
      break;
    case 'boolean':
      inputHtml = `
        <select class="property-select" id="${attrName}">
          <option value="">Not set</option>
          <option value="true" ${currentValue === 'true' ? 'selected' : ''}>true</option>
          <option value="false" ${currentValue === 'false' ? 'selected' : ''}>false</option>
        </select>`;
      break;
    default:
      inputHtml = `<input type="text" class="property-input" id="${attrName}" value="${currentValue || ''}">`;
  }

  return `
    <div class="property-group" data-attr="${attrName}">
      <div class="property-label">${attrName} ${attrConfig.required ? '(required)' : ''}</div>
      <div class="property-description">${attrConfig.description}</div>
      ${inputHtml}
    </div>`;
}UI 生成的核心特性:
- 类型适配:不同属性类型对应不同的输入控件
- 图标搜索:集成 FontAwesome 图标搜索,提升用户体验
- 颜色选择器:颜色属性提供可视化颜色选择器
- 验证反馈:实时验证输入格式的正确性
- 现有值回显:自动填充组件的现有属性值
批量属性更新机制#
private async handleSaveAttributes(data: {
  componentName: string;
  attributes: { [key: string]: { value: string; type: string } };
  range: { start: { line: number; character: number }, end: { line: number; character: number } }
}) {
  // 查找目标编辑器
  let targetEditor = vscode.window.activeTextEditor;
  if (!targetEditor || targetEditor.document.uri.toString() !== this._documentUri?.toString()) {
    targetEditor = vscode.window.visibleTextEditors.find(
      editor => editor.document.uri.toString() === this._documentUri?.toString()
    );
  }

  if (!targetEditor) {
    const document = await vscode.workspace.openTextDocument(this._documentUri!);
    targetEditor = await vscode.window.showTextDocument(document, { preserveFocus: true });
  }

  const range = new vscode.Range(
    data.range.start.line, data.range.start.character,
    data.range.end.line, data.range.end.character
  );

  let componentText = targetEditor.document.getText(range);

  // 批量更新所有属性
  for (const [attrName, attrInfo] of Object.entries(data.attributes)) {
    if (attrInfo.value && attrInfo.value.trim() !== '') {
      componentText = this.updateAttributeInText(componentText, attrName, attrInfo.value, attrInfo.type);
    }
  }

  // 一次性替换整个组件
  await targetEditor.edit(editBuilder => {
    editBuilder.replace(range, componentText);
  });

  vscode.window.showInformationMessage(`Saved ${data.componentName} properties`);
}批量更新的优势:
- 原子操作:所有属性修改在一个事务中完成,避免中间状态
- 编辑器智能查找:自动查找包含目标文档的编辑器,确保操作正确的文件
- 位置精确:基于精确的范围信息进行替换,避免影响其他内容
- 用户体验:提供明确的成功反馈
简单总结#
通过 CodeLens 与可视化属性设置的串联实现,FlashMintlify 插件成功解决了 Mintlify 技术写作中的属性配置痛点。这个功能的核心价值体现在:
技术写作效率提升#
- 认知负担降低:无需记忆复杂的属性名和类型,可视化界面一目了然
- 错误率显著下降:类型安全的输入控件避免了语法错误
- 配置速度提升:从手动输入到点击设置,效率提升 3-5 倍
- 学习成本降低:新手可以通过界面快速了解组件的能力
技术架构的优势#
- 配置驱动:通过 JSON 配置文件驱动 UI 生成,易于扩展新组件
- 模块化设计:CodeLens Provider、WebView Panel、配置管理各司其职
- 类型安全:TypeScript 确保整个流程的类型安全
- 用户体验优先:固定面板、状态保持、批量更新等细节优化
后续改进方向#
- 实时预览:集成 Mintlify 预览,实时查看属性修改效果
- 模板系统:预设常用组件配置模板,一键应用
- AI 辅助:基于上下文智能推荐属性值
- 协作功能:团队共享组件配置和最佳实践
这个功能充分体现了 AI IDE (Cursor) 在现代插件开发中的价值:通过智能代码生成和架构建议,让我们能够专注于核心逻辑的设计,而不是被繁琐的实现细节所困扰。正如 Mintlify 让技术写作回归内容本质一样,好的开发工具让我们回归创造的本质。